
This tutorial will guide you to remove FRP Lock on Galaxy Smartphone Using Combination Firmware.
I hope that everyone who tried to factory data reset their Samsung Android Smartphone which has Marshmallow or higher firmware have came across something called the FRP Lock (factory reset protection). This is an Android security feature which is a nightmare for many who forgot their Google account credentials that they used to setup their account initially on that phone.
Please don’t worry because we have a working method which involves combination firmware to disable/bypass the FRP lock on your Galaxy phone.
Before that;
How to identify if you are really in FRP lock?
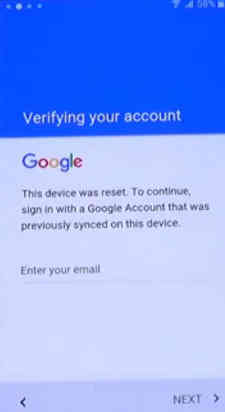
If you are stuck up in a similar screen like the one given below after factory data resetting your phone then you are in FRP Lock.
But what is the actual issue here,
You will not be allowed to use your Galaxy Smartphone until you login using the same Google Account you initially used. Practically your phone will become useless until you remove the FRP lock or login using the correct credentials.
So this is a serious issue until resolved.
This method is compatible on all Galaxy Smartphones which has it’s combination firmware file available for download. However we are providing here a list of known phones that are given below.
We intend this tutorial for those who accidentally got locked out of their phone because of FRP lock and not for any illegal purpose.
Please note that FRP lock disabling using this method may void your warranty, so please proceed with caution. Also SamsungSFour.Com will not be liable for any damage caused as a result of this tutorial.
What is a combination firmware?
Combination firmware is a “.zip” or “.tar” format firmware file (which has 4 or 5 files archived together) which has a pre-enabled USB debugging and OEM unlocked firmware. As you are already aware we need to enable the USB debugging mode and OEM unlocking before flashing any firmware. However with combination firmware we can do the before said without that.
As I already mentioned we are using a different method here called the “combination firmware” method because we have already explained the other method before.
So lets go straight away to the steps now.
This method will not work on all phones, so please to the second method if this one fails.
Steps to remove FRP lock on Galaxy Android Smartphone using the Combination Firmware method
Method-1
By flashing stock ROM to remove FRP lock on Galaxy Smartphone
Please note that in the 1st method we are not using the combination firmware but the stock firmware file (which has 4 or 5 file archived together). If this method doesn’t work proceed to method 2 which uses combination firmware method.
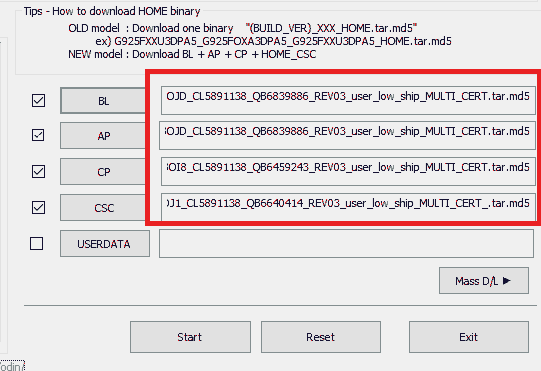
1. First of all you need to download the stock rom file corresponding to your device. Make sure that it has 4 or 5 files archived together (which contains files BL, AP, CSC etc). The downloaded file will be in “.zip” or “.tar” format.
Now;
Once the Odin file is downloaded please extract it to your PC desktop and open the Odin.xx..exe file.
2. Now enter your Samsung Galaxy Android Smartphone into the “Download Mode”. To enter into the download mode please switch of your phone and press and hold “Vol Down”+”Home”+”Power” buttons at the same time and press the “Vol Up” button when you get the warning screen to enter into the “Download Mode”. The procedure for some Galaxy models may be different so you try the below links for more detailed model specific tutorials on download mode.
- How To Enter & Exit Download Mode on Galaxy S10, S10e & S10 Plus?
- Enter Download Mode On Galaxy Smartphones Without Home Button?
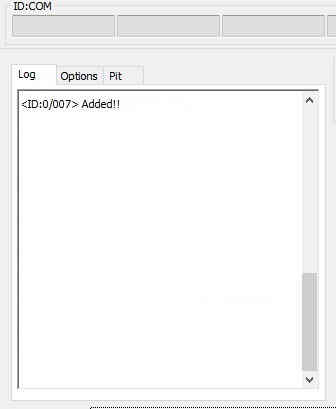
3. Once in download mode connect your Galaxy Smartphone using the USB data cable. Once the connection is made successfully you will get an added message from the Odin app like shown in the screenshot below.
If you didn’t got the confirmation please install/reinstall the Samsung USB drivers from the below link and try again.
4. Now extract the stock “.zip” or “.tar” firmware file that you have already downloaded before. You will get 4 or 5 files after extraction like shown below.

5. Once done you may click the “AP” button and select the appropriate file (the file which starts with the name “AP”) from the extracted firmware, same way click “BL”, “CSC”, “CP” buttons and select the files.You may check the below screenshot for reference.
Once done click the “Start” button in Odin app to start the flashing process.
Now wait for the flashing procedure to get finished. Once finished and rebooted you are good to go, the FRP lock on your Samsung Galaxy Android Smartphone will be successfully removed now.
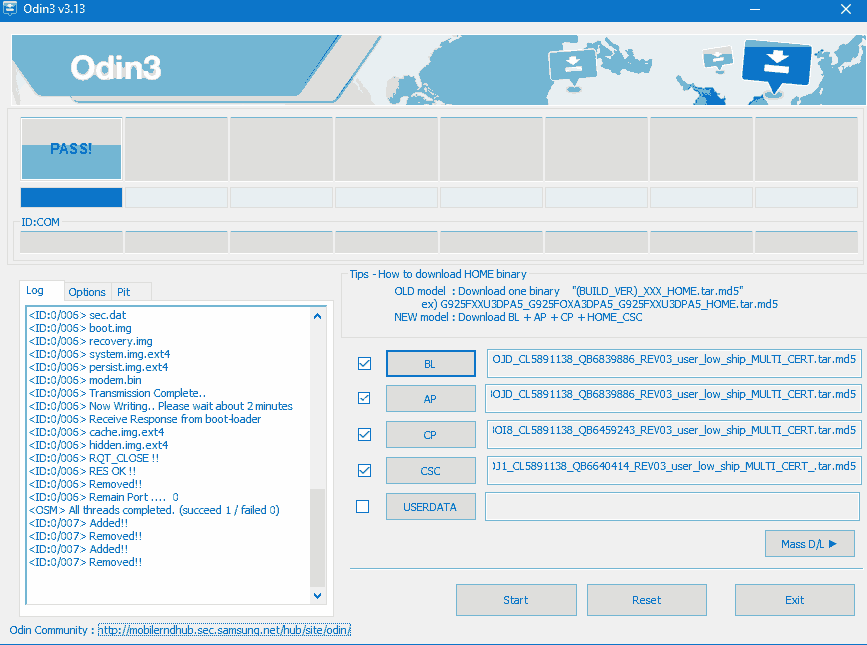
If the whole process was successful you will get a “Pass” message in Odin as shown in the screenshot above.
If the above method didn’t worked on your phone please proceed to the 2nd method.
Method-2
Using combination firmware to remove FRP lock on Galaxy Smartphone
1. First you need to switch off your Galaxy Smartphone and enter it into the “Download Mode”.
To enter into the download mode please switch of your phone and press and hold “Vol Down”+”Home”+”Power” buttons at the same time and press the “Vol Up” button when you get the warning screen to enter into the “Download Mode”. The procedure for some galaxy models may be different so you try the below links for more detailed model specific tutorials on download mode.
- How To Enter & Exit Download Mode on Galaxy S10, S10e & S10 Plus?
- Enter Download Mode On Galaxy Smartphones Without Home Button?
2. Now download the combination file. A complete list of combination file download links are very hard to find. From wherever you are downloading please make sure that you are selecting the correct binary other vice you may end up bricking your device.
If you like to download the combination firmware by searching Google. For eg: If you need combination firmware for Galaxy S8 G950F. Search in Google like this “Galaxy S8 G950F Combination Firmware Download“. The downloaded file will be in “.zip”, “.tar” or “rar” format.
Once downloaded please extract it your computer desktop.
Now download the Odin app from the below link.
Extract it once download finished.
3. Now open the Odin.exe file and connect your Samsung Galaxy Smartphone using the USB cable to your PC.
Once the connection is made successfully you will get an added message from the Odin app like shown in the screenshot below.
If you didn’t got the confirmation please install/reinstall the Samsung USB drivers from the below link and try again.
4. Now click the “AP” button in the Odin and app and select the “tar.md5” combination file you have already downloaded and extracted in “Step-2”.
5. Once done click the “Start” button in the Odin app and wait for the procedure to get finished. When finished your phone will boot into factory binary. Now switch it off and enter it into the recovery mode. To enter into recovery mode please press and hold the “Vol Up+Home+Power” buttons at the same time. The steps will be different on different models so it’s better to check the appropriate tutorials by using our search form. Couple of sample tutorials are given below.
- How To Enter Samsung Galaxy Smartphone in Recovery Mode? (All Models)
- How To Resolve Not Able To Enter Recovery Mode On Galaxy Smartphone When In Bootloop?
6. In the next step we are going to factory reset your phone from the recovery menu. For that please select “Wipe Data/Factory Reset” option in the recovery menu. Use the “Vol + and Vol –” keys to toggle through the options and use the “Power” button to confirm the selection. Once factory reset is done select “Reboot system now” in the recovery menu.
Once booted up you will be entered into a similar screen like the one given below.
Here click the mosaic menu icon (marked in red box) and you will be entered into the app drawer similar like in the normally booted up phone. Now tap on “Settings” and enable USB debugging and OEM unlock from developer options (skip this step if they are already enabled).
To enable developer options please go to “About” in settings menu and tap on “Build number” until you see “You are now a developer”.
7. Now go back to Settings main menu and you will see a new menu entry called the “Developer options”. Tap on it and make sure that the “USB debugging” is enabled.
8. Once confirmed switch off your phone again and enter it into the download mode one more time.
Download Firmware Files
9. Now you need to download the stock ROM of your device.
- J Series Stock ROM/Firmware
- A Series Stock ROM/Firmware
- Note Series Stock ROM/Firmware
- S Series Stock ROM-Firmware
- Tab Series Stock ROM-Firmware
A few links are given above. If your device is not listed here please search using Google. Once downloaded please extract it. In the extracted files please find the file which starts with “AP”. Make sure that you have installed the “WinRAR” or “7-Zip” windows app before proceeding to the next step.
Please make sure that you download the full firmware (4/5 file type which consists of “AP”, “BL”, “CSC” etc as archives in the main “zipped” file) other vice this method will not work.
Now right click on the file which starts with “AP” and “Open With” “WinRAR or 7-Zip”. Now extract the marked files in the screenshot alone.

Once done select the file which starts with “BL” and “Open With” “WinRAR or 7-Zip”. From the archive extract red boxed file alone to the same location were you have previously extracted 3 files before.

Now zip all the extracted files to a single file in “.tar” format. The archive files will be “boot.img.lz4”, “system.img.lz4″, sboot.bin.lz4”.
10. In the next step I am assuming your Galaxy Smartphone is already in the “Download Mode” and connected to the computer were the “Odin” app is already open. So now click the “AP” button in the Odin app and select the newly archived “.tar” file (the file which is archived with “boot.img.lz4”, “system.img.lz4″, sboot.bin.lz4”).
11. Now click the “Start” button in the Odin app and wait for the flashing process to get completed. Once the process is finished and booted up you are good to go. You can confirm the process success by the “PASS” message from the Odin app. The FRP lock on it will be removed now.
However if you have faced any issues while trying to remove FRP Lock on your Galaxy Smartphone using combination firmware method, please feel free to post it in the comment section below, don’t worry I will help you as fast I can.
Common errors while installing combination firmware on your Galaxy Smartphone and their solutions
1. Can’t open the serial(com) port
Cause: Most probably this issue arises due USB driver issues.
Solution: Install the latest Samsung USB driver from here;
Once installed remove the USB cable and restart your PC and try the flashing steps again.
2. Complete(write) operation failed
Cause: This is a general error. Causes can be a lot.
Solution: So first try the above step first. If it’s not working please double check whether you have enabled USB debugging and OEM unlock in developer options.
If none of the above solutions are working try using the patched Odin. Please download the patched Odin 3.13.1.3B from here.
3. Please get approval to use factory binary (Pit)
Actually this is the worst error of all. Some solution works for some phones while some not. There are phones which doesn’t even have any solution for this error yet.
Cause: New security feature in Android firmware which strictly block the installation of custom ROMs and combination firmware.
Solution: You may download and try the patched Odin from the above link to resolve this. If that doesn’t help try the below steps.
First you need to take a backup of your “PIT” file using the “Samsung Tool Pro” (it’ a payed windows software) app and insert the same in the Odin by going to the “PIT” tab in the Odin and by clicking the PIT button. This should be done while trying to flash with the combination firmware.
If the baked up PIT file didn’t work try searching Google for a PIT file which is for your phone.
Alternate FRP removing tutorials
The above method may not work on certain models to if it is not working for you please try the below tutorial which uses a different but effective method for the same.
- How To Remove FRP Lock On Samsung Galaxy Android Smartphone?
- How To Remove FRP Lock On Android 10 Galaxy Smartphone (2020 Latest Method)?
Compatible Galaxy models to remove FRP Lock On Galaxy Smartphone
These are just a few devices, most of the Samsung Galaxy devices are compatible with this method. The Samsung Galaxy Note Pro 12.2 3G , Note Pro 12.2 LTE , Note 4 , Note 4 (USA) , Note 4 Duos , Note Edge , Note5 Duos , Note5 , Note5 (USA) , Note7 (USA) , Note7 , Note FE , Note8 , Note9 , Note10 , Note10 5G , Note10+ , Note10+ 5G , M10 , M20 , M30 , M40 , M10s , M30s , Fold , Fold 5G , A5 Duos , A3 , A3 Duos , A5 , A7 , A7 Duos , A8 , A8 Duos , A3 (2016) , A5 (2016) , A7 (2016) , A9 (2016) , A9 Pro (2016) , A8 (2016) , A3 (2017) , A5 (2017) , A7 (2017) , A6 (2018) , A6+ (2018) , A8 Star (A9 Star) , A7 (2018) , A9 (2018) , A6s , A8s , A10 , A20 , A20e , A30 , A40 , A50 , A2 Core , A60 , A70 , A80 , A10e , A10s , A50s , A30s , A90 5G , A20s , A70s , C5 , C7 , C9 Pro , C7 Pro , C5 Pro , C7 (2017) , E5 , E7 , On5 , On7 , On5 Pro , On7 Pro , On8 , On6 , J1 , J1 4G , J5 , J7 , J2 , J3 (2016) , J1 (2016) , J1 Nxt , J5 (2016) , J7 (2016) , J3 Pro , J2 (2016) , J2 Pro (2016) , J Max , J7 Prime , J5 Prime , J2 Prime , J1 Mini Prime Android 6.0 Marshmallow – LTE model , J3 Emerge , J7 V , J5 (2017) , J7 Max , J7 (2017) , J7 Pro , J3 (2017) , J2 (2017) , J2 Pro (2018) , J7 Prime 2 , J7 Duo , J4 , J6 , J3 (2018) , J8 , J7 (2018) , J2 Core , J4+ , J6+ , J4 Core , Tab Pro 8.4 3G/LTE , Tab Pro 10.1 , Tab Pro 10.1 LTE , Tab Pro 12.2 , Tab Pro 12.2 3G , Tab Pro 12.2 LTE , Tab 3 Lite 7.0 3G , Tab 4 7.0 LTE , Tab 4 7.0 3G , Tab 4 7.0 , Tab 4 10.1 LTE , Tab 4 10.1 3G , Tab 4 10.1 , Tab 4 8.0 LTE , Tab 4 8.0 3G , Tab 4 8.0 , Tab S 10.5 , Tab S 10.5 LTE , Tab S 8.4 , Tab S 8.4 LTE , Tab 3 Lite 7.0 VE , Tab 3 V , Tab A 8.0 , Tab A 9.7 , Tab A & S Pen , Tab 4 10.1 (2015) , Tab S2 8.0 Android 6.0.1 Marshmallow – T719N , Tab S2 9.7 Android 6.0.1 Marshmallow – T813N, T819N , Tab E 8.0 , Tab A 7.0 (2016) , Tab A 10.1 (2016) , Tab J , Tab S3 9.7 , Tab A 8.0 (2017) , Tab Active 2 , Tab A 10.5 , Tab S4 10.5 , Tab A 8.0 (2018) , Tab Advanced2 , Tab A 8.0 & S Pen (2019) , Tab A 8 (2019) , Tab A 10.1 (2019) , Tab S5e , Tab A 8.0 (2019) , Tab S6 , Tab Active Pro , Ace Style , Ace 4 LTE G313 , Ace NXT , Ace Style LTE G357 , Grand 2 , Grand Neo GT-I9060I , Grand Prime , Grand Prime Duos TV , Grand Max , Grand Prime Plus , Core Lite LTE , Core 2 , Core LTE G386W , Core Prime , Xcover 3 , Xcover 3 G389F , Xcover 4 , Xcover 4s , Xcover FieldPro , Pocket 2 , View View2, S10, S10 Plus, S10e, S20, S20+, S20 Ultra and S20 5G.
If “How To Remove FRP Lock On Galaxy Smartphone Using Combination Firmware?” tutorial really helped you, please give a like/share on social networking websites by using the below given buttons.