
This tutorial will help you to install stock ROM on your Samsung Galaxy A52s 5G.
The Galaxy A52s 5G is a very popular Smartphone in the “A”series that comes with a 6.5 inches Super AMOLED capacitive touchscreen display having 256GB of storage and 8GB of RAM, it’s factory installed with the Android 11 firmware and One UI 3.1. It also has a quad camera having 64 MP main camera.
Now lets proceed to our actual agenda today which is installing the Stock firmware on Samsung Galaxy A52s 5G. This method is compatible on all Galaxy A52s 5G models like SM-A528B.
Further, if you are here you maybe looking for;
- How to manually download and install official Stock ROM, Android 11 On Samsung Galaxy A52s 5G? (SM-A528B)
- How to manually download and install official Stock ROM, Android 12 On Samsung Galaxy A52s 5G?
So lets proceed with the steps.
However before proceeding please make sure that you have made a complete backup of your phone storage so that you can recover from a worst case scenario. SamsungSFour.Com will not be liable under any circumstance for loss of data or bricking your device. Please proceed at your own risk.
Steps To Install Official Android 11 Stock ROM (One UI) On Galaxy A52s 5G Using the Odin app
1. First you need to download and install the Samsung USB drivers. You can do that it from the below link;
2. Now we need to enable the developer options, USB debugging and perform the OEM unlock on your Galaxy A52s 5G Smartphone.
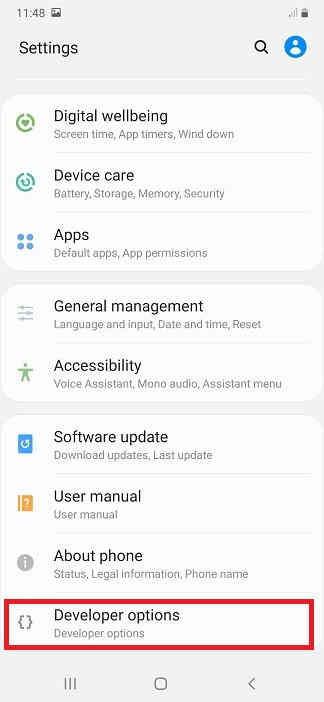
To enable “Developer Options” on your Galaxy Smartphone goto Settings>About phone>Software Information, and tap on the “Build number” 10 times until you get a message that you are a “developer“. Now you will see an additional menu entry in the “Settings” menu called “Developer Options” as shown below.
Once you have enabled the “Developer Options” tap on it and you will see a similar screen as shown below (These are from One UI 2.0, if your UI version is something else slight difference maybe there).
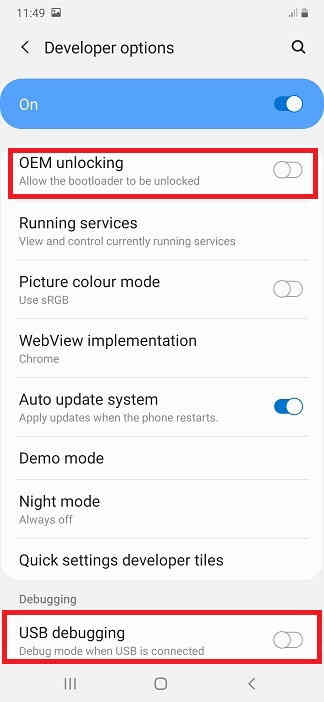
Now tap on “OEM unlocking” and “USB debugging” to enable it. If you get a popup warning, tap enable if you would like to proceed.
You may also check this video if you have any doubt about the above process.
In some cases after “OEM unlocking” is enabled you may need to unlock the “Bootloader” also. Please try the below tutorial if you get a failed message in Odin;
3. Once done you need to download the firmware files and the Odin app from the below links.
Please download the files corresponds to your device from the below links;
- Download Stock Rom For Samsung Galaxy A52s 5G: SM-A528B
You may need to login/create a free account to download the files from the 3rd party website. Also make sure that your phones bootloader is not locked by any carrier, if so please unlock it first before proceeding with the firmware installation.
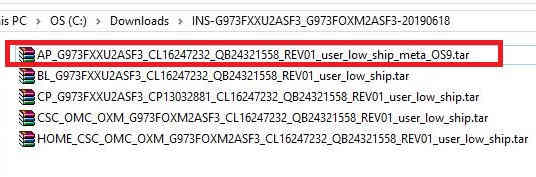
Once downloaded please extract it and you will get similar files like given below;
4. Now download the Odin app from the below link or download the latest version of Odin;
When the download has finished please extract the file to your PC desktop and open the “Odin..xxx.exe” file.
5. In the next step you need to enter your Galaxy A52s 5G Smartphone into the “download mode“.
For that first you need to switch of your Galaxy A52s 5G device. Now switch it back on and when you see the “Samsung” logo on the screen press and hold “Volume Down + Volume Up” and connect your mobile with your PC using a USB data cable.

Now when you get the above warning message on your phone screen press “Vol Up” button to enter into the “Download Mode“. You may also try the below video tutorial if you have any confusion which uses a different method. The demo phone used here is M30s. Please follow this link to watch the video.
6. Now go back to your Odin window which looks like the below screenshot;
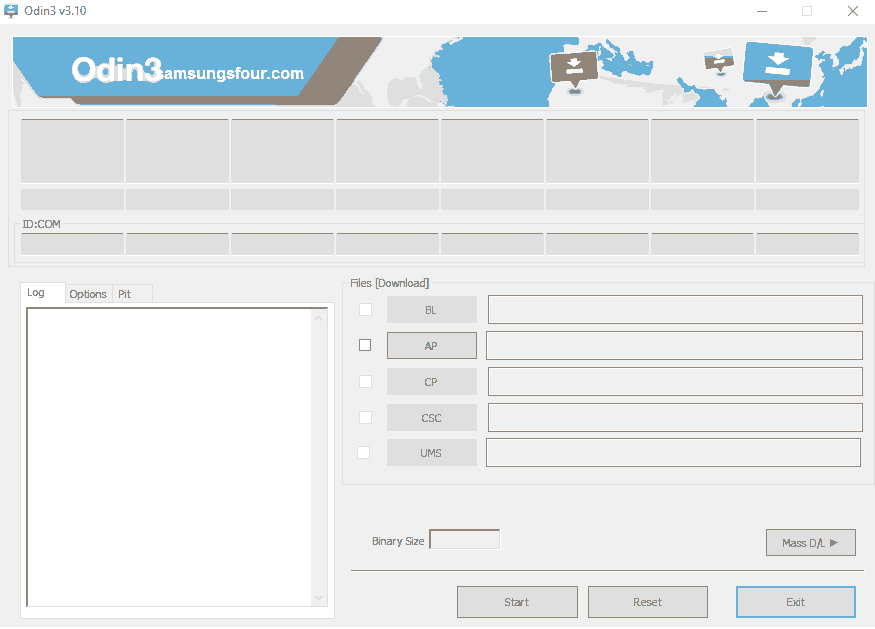
In the next step select the extracted firmware files (done in step-3) corresponding to each buttons in the odin app. For example click on button “CP” and select the extracted firmware file which starts with “CP“. Same way click on “AP” and and select the extracted firmware file which starts with “AP“. Similarly, add BL file in the BL button.
If you want to factory reset while you install stock firmware select the file which starts with “CSC” file for the CSC button, otherwise, load the “HOME_CSC” instead.
Make sure F.Reset.Time and Auto Reboot option are the only ones checked in the Odin’s “Options” tab.
If you don’t want the previous data on your phone please skip the last button on Odin which is “UMS” or “USERDATA“.
7. Once everything is done as said above, click the “Start” button in the Odin app and wait for the flashing process to get finished. Finally when it’s done your phone will reboot and you will get a “Pass” message from the Odin app which confirms successful firmware installation.
Further, if you are interested in more Galaxy A52s 5G tutorials. Please check out them below;
However, if you got any Odin error while installing the firmware please try the below tutorial to which may solve the problem.
- How To Resolve Odin Flash Failed Error On Galaxy Smartphone?
- How To Fix “An Error Occurred While Updating The Device Software” On Galaxy Smartphone?
However if you have faced any issues which needs any support while trying to install Stock ROM, Android 11, Android 12 on Galaxy A52s 5G , please feel free to post it in the comment section below, don’t worry I will help you as fast as I can.
If “How To Install Stock ROM On Samsung Galaxy A52s 5G?” tutorial really helped you, please give a like/share on social networking websites by using the below given buttons.