
Hi folks, this tutorial will help you to download and install the latest “LineageOS 20.0-20231123-nightly-crownlte-signed“, Android 13 on your Samsung Galaxy Note9 SM-N960F, SM-N9600, SM-N960F, SM-N960U, SM-N960U1, SM-N960N, SM-N960W, SM-N960X and SCV40.
What is LineageOS?
LineageOS is an open-source operating system for smartphones and tablet computers, based on the Android mobile platform. It is the successor of CyanogenMod project. The main benefits of LineageOS are Customization, Security Updates, Compatibility, Performance, Open Source and No Bloatware.
Now lets proceed to the steps.
Disclaimer
Installing custom ROM may void your warranty so please proceed with caution. Before doing any of the steps below please make sure that you have made a complete backup of your device and charged it to at least 80% of it’s full battery power.
Steps to install LineageOS 20.0 On Galaxy Note9
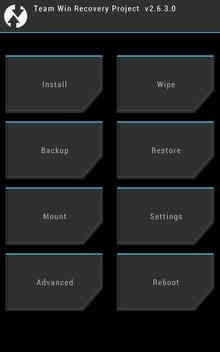
Installing TWRP On Galaxy Note9
- Before proceeding the flashing procedure you need to install TWRP on your Galaxy Note9 without which you will not able to install the LineageOS, download TWRP and necessary files from the below given link;
- Download TWRP for Galaxy Note9 (Exynos)
- Download TWRP for Galaxy Note9 (Snapdragon)
- Download Odin v3.14.1
You need to extract Odin file after downloading.
Now you need to install the TWRP on your Galaxy Note9.
2. Pr-Requisites for Installing TWRP On Galaxy Note9
You need to enable the first 3 options given below and need to unlock the bootloader;
First you need to enter the download mode. For that you need to press and hold the “Vol Up” + “Vol Down” button at the same time and insert the USB cable to your device while it is connected to your PC.
Now you will enter in Download Mode. Now open the Odin app and click “AP” and select the TWRP.tar file. Once done click on the “Start” button in the Odin app and wait for the process to complete. Now Reboot your Galaxy Note9 in recovery mode: while it still plugged in to your PC, hold both the “Power” and “Vol Up” buttons.
Once TWRP has booted you need to format again your data partition in order to be able to boot in system again. To do so touch Wipe->Format Data and follow the instructions on screen.
3. Now please download Lineage OS 20.0 to your PC desktop from the below link;
Once downloaded please copy it to your Galaxy Note9’s SdCard.
4. Now please boot into TWRP recovery mode by pressing and holding “Volume Up+Power” buttons at the same time while the device is connected to a PC via USB cable.
5. Once in recovery mode tap on “Wipe“and tap on “Advanced Wipe“.

Now select every other partition other than the Internal Storage.
Flashing LineageOS
6. Once done go to TWRP recovery mode homepage and tap on “Install” and select the LineageOS zip package which you have already downloaded and copied to your phone’s SDCard.
7. Now once the zip file is selected swipe to flash it with the LineageOS on your Note9.
The flashing process is a lengthy one so please wait until it’s finished.
Once the process is completed your Galaxy Note9 will restart, now follow the configuration steps. After the preliminary configurations are done you can use your Note9 with the latest LineageOS 20.0 / Android 13.
Normal queries for this tutorial
- How to install LineageOS 20.0/Android 13 on Galaxy Note9 SM-N960F, SM-N9600, SM-N960F, SM-N960U, SM-N960U1, SM-N960N, SM-N960W, SM-N960X and SCV40?
- Lineage OS Note9
- Install custom ROM for Galaxy Note9
- LineageOS 20 download
- Lineage OS android 13 download
- Lineage OS 20
- How to install lineage OS 20?
If you have faced any issues while trying to install the custom ROM LineageOS 20.0, please feel free to contact us, don’t worry I will help you as fast as I can.
If “How To Install LineageOS 20.0 On Galaxy Note9?” tutorial really helped you, please give a like/share on social networking websites by using the below given buttons.