This tutorial will help you to resolve the common software glitches on your Samsung Galaxy Android Smartphones like Galaxy Android Smartphone Stuck In Recovery After Downgrading Firmware, FRP Lock, Kernal/Recovery is not seandroid enforcing Set Warranty Bit Recovery, Unable To Downgrade Firmware, Unable To Upgrade Firmware, Heating Issues etc.
Table of Contents
- A Preface
- Galaxy Android Smartphone Stuck In Recovery After Downgrading Firmware
- FRP Lock On Samsung Galaxy Android Smartphone
- Galaxy Android Smartphone With Error “Kernal/Recovery is not seandroid enforcing Set Warranty Bit Recovery” When Booting Up
- Unable To Downgrade Firmware On Galaxy Android Smartphone
- Unable To Upgrade Firmware On Galaxy Android Smartphone
- Heating Issues On Galaxy Android Smartphone
- Normal queries for this tutorial
- Steps To Resolve The Above Software glitches On Galaxy Android Smartphone Using Combination Firmware
A Preface
Even though the heading looks so precise and little bit complicated there is nothing like “complicated” here. Because this tutorial only deals with the software glitches of your Samsung Galaxy Android Smartphone, so strictly no hardware.
As the title says this tutorial will help you to repair your Samsung Galaxy Smartphone from almost all software glitches/issues like frp lock, binary blocked by FRP, unable to factory reset, always enter into recovery mode when booting up phenomenon, stuck on recovery mode, to remove/replace custom recovery like TWRP, Philz, CWM, phone stuck on the Samsung logo/bootloop, IMEI, baseband, serial number, WiFi, NFC and Bluetooth issues, Samsung Knox fix, high temperature issues on Galaxy phones, to alter CSC of your phone, update Android version manually, camera issues on Samsung Android Smartphones, fix storage space full error on Samsung phones, slow performance issues, sensors errors, application stop working issues, remove root on Galaxy, software related sound problems, unable to downgrade firmware version, unable to update firmware manually using Odin, set warranty bit kernel, recovery is not seandroid enforcing, kernal is not seandroid enforcing etc.
First let me list out all the common software glitches first and then proceed to the solution at the end.
Some common scenarios;
Galaxy Android Smartphone Stuck In Recovery After Downgrading Firmware
This issue can be resolved by yourself if you have some dedicated time to spend. As you all know all Galaxy Android Smartphones degrade it’s performance over time and all the solutions points out to downgrading it’s firmware. However most of the time downgrade fails and you will be stuck in the recovery mode. So in order to fix that you need to install the combination firmware rather than the normal fimware.
How to do that?
Don’t worry we will explain that procedure in the end of this tutorial.
FRP Lock On Samsung Galaxy Android Smartphone
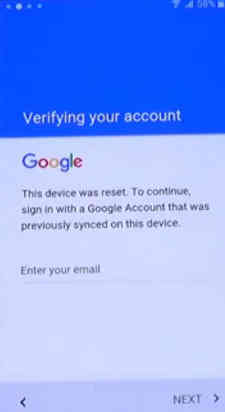
Almost all of us may have gone through this weird situation were you are stuck in the FRP lock (factory reset protection) which was introduced from Marshmallow and higher firmware versions. This is an Android security feature which is a nightmare for many who forgot their Google account credentials that they used to setup their account initially on that phone. As the name says it protects your Galaxy Android Smartphone from unauthorized factory data resets.
So in order to fix that you need to install the combination firmware on your Galaxy phone using the Odin application. We will explain the method later in this tutorial.
Galaxy Android Smartphone With Error “Kernal/Recovery is not seandroid enforcing Set Warranty Bit Recovery” When Booting Up
This error stops you in the recovery menu all the time you try to switch ON your phone. Normally you will get this error after a factory data reset, custom recovery installation, rooting, manual firmware installation using Odin or after downgrading the firmware.
As already mentioned above in order to fix that also you need to install the combination firmware on your Galaxy phone using the Odin application which will be explained in detail later.
Unable To Downgrade Firmware On Galaxy Android Smartphone
This is the most common issue after a bootloader upgrade through OTA. In this scenario you will not be able to downgrade your firmware, no matter what methods you try always the flashing will be failed and even if it’s a success the phone will fail to boot up successfully. This is because the updated bootloader is not compatible with the older versions of the firmware.
So in order to fix that you need to downgrade the bootloader along with the firmware. For that you may need to install the combination firmware.
Unable To Upgrade Firmware On Galaxy Android Smartphone
On some Samsung Galaxy Android Smartphones the reverse happens, in this case you may not be able to upgrade the firmware manually. So in order to fix that you need to upgrade the bootloader along with the firmware. For that you may need to install the combination firmware instead of the normal one.
Heating Issues On Galaxy Android Smartphone
Heating issues in most cases if not hardware related are due to corrupt firmware or a rogue app. For that the best thing to do is to factory data reset the phone. But in some cases it fails, now the only option left is to install the combination firmware.
If I list out all the scenarios the tutorial will be too lengthy and it will be very difficult for you to find out the real solution, so I am going straight away to the steps to install Combination Firmware on your Samsung Galaxy Android Smartphone.
Please note that this fix works on almost all Samsung Galaxy Smartphones like Galaxy Note Pro 12.2 3G , Samsung Galaxy Note Pro 12.2 LTE , Samsung Galaxy Note 4 , Samsung Galaxy Note 4 (USA) , Samsung Galaxy Note 4 Duos , Samsung Galaxy Note Edge , Samsung Galaxy Note5 Duos , Samsung Galaxy Note5 , Samsung Galaxy Note5 (USA) , Samsung Galaxy Note7 (USA) , Samsung Galaxy Note7 , Samsung Galaxy Note FE , Samsung Galaxy Note8 , Samsung Galaxy Note9 , Samsung Galaxy Note10 , Samsung Galaxy Note10 5G , Samsung Galaxy Note10+ , Samsung Galaxy Note10+ 5G , Samsung Galaxy M10 , Samsung Galaxy M20 , Samsung Galaxy M30 , Samsung Galaxy M40 , Samsung Galaxy M10s , Samsung Galaxy M30s , Samsung Galaxy Fold , Samsung Galaxy Fold 5G , Samsung Galaxy A5 Duos , Samsung Galaxy A3 , Samsung Galaxy A3 Duos , Samsung Galaxy A5 , Samsung Galaxy A7 , Samsung Galaxy A7 Duos , Samsung Galaxy A8 , Samsung Galaxy A8 Duos , Samsung Galaxy A3 (2016) , Samsung Galaxy A5 (2016) , Samsung Galaxy A7 (2016) , Samsung Galaxy A9 (2016) , Samsung Galaxy A9 Pro (2016) , Samsung Galaxy A8 (2016) , Samsung Galaxy A3 (2017) , Samsung Galaxy A5 (2017) , Samsung Galaxy A7 (2017) , Samsung Galaxy A6 (2018) , Samsung Galaxy A6+ (2018) , Samsung Galaxy A8 Star (A9 Star) , Samsung Galaxy A7 (2018) , Samsung Galaxy A9 (2018) , Samsung Galaxy A6s , Samsung Galaxy A8s , Samsung Galaxy A10 , Samsung Galaxy A20 , Samsung Galaxy A20e , Samsung Galaxy A30 , Samsung Galaxy A40 , Samsung Galaxy A50 , Samsung Galaxy A2 Core , Samsung Galaxy A60 , Samsung Galaxy A70 , Samsung Galaxy A80 , Samsung Galaxy A10e , Samsung Galaxy A10s , Samsung Galaxy A50s , Samsung Galaxy A30s , Samsung Galaxy A90 5G , Samsung Galaxy A20s , Samsung Galaxy A70s , Samsung Galaxy C5 , Samsung Galaxy C7 , Samsung Galaxy C9 Pro , Samsung Galaxy C7 Pro , Samsung Galaxy C5 Pro , Samsung Galaxy C7 (2017) , Samsung Galaxy E5 , Samsung Galaxy E7 , Samsung Galaxy On5 , Samsung Galaxy On7 , Samsung Galaxy On5 Pro , Samsung Galaxy On7 Pro , Samsung Galaxy On8 , Samsung Galaxy On6 , Samsung Galaxy J1 , Samsung Galaxy J1 4G , Samsung Galaxy J5 , Samsung Galaxy J7 , Samsung Galaxy J2 , Samsung Galaxy J3 (2016) , Samsung Galaxy J1 (2016) , Samsung Galaxy J1 Nxt , Samsung Galaxy J5 (2016) , Samsung Galaxy J7 (2016) , Samsung Galaxy J3 Pro , Samsung Galaxy J2 (2016) , Samsung Galaxy J2 Pro (2016) , Samsung Galaxy J Max , Samsung Galaxy J7 Prime , Samsung Galaxy J5 Prime , Samsung Galaxy J2 Prime , Samsung Galaxy J1 Mini Prime Android 6.0 Marshmallow - LTE model , Samsung Galaxy J3 Emerge , Samsung Galaxy J7 V , Samsung Galaxy J5 (2017) , Samsung Galaxy J7 Max , Samsung Galaxy J7 (2017) , Samsung Galaxy J7 Pro , Samsung Galaxy J3 (2017) , Samsung Galaxy J2 (2017) , Samsung Galaxy J2 Pro (2018) , Samsung Galaxy J7 Prime 2 , Samsung Galaxy J7 Duo , Samsung Galaxy J4 , Samsung Galaxy J6 , Samsung Galaxy J3 (2018) , Samsung Galaxy J8 , Samsung Galaxy J7 (2018) , Samsung Galaxy J2 Core , Samsung Galaxy J4+ , Samsung Galaxy J6+ , Samsung Galaxy J4 Core , Samsung Galaxy Tab Pro 8.4 3G/LTE , Samsung Galaxy Tab Pro 10.1 , Samsung Galaxy Tab Pro 10.1 LTE , Samsung Galaxy Tab Pro 12.2 , Samsung Galaxy Tab Pro 12.2 3G , Samsung Galaxy Tab Pro 12.2 LTE , Samsung Galaxy Tab 3 Lite 7.0 3G , Samsung Galaxy Tab 4 7.0 LTE , Samsung Galaxy Tab 4 7.0 3G , Samsung Galaxy Tab 4 7.0 , Samsung Galaxy Tab 4 10.1 LTE , Samsung Galaxy Tab 4 10.1 3G , Samsung Galaxy Tab 4 10.1 , Samsung Galaxy Tab 4 8.0 LTE , Samsung Galaxy Tab 4 8.0 3G , Samsung Galaxy Tab 4 8.0 , Samsung Galaxy Tab S 10.5 , Samsung Galaxy Tab S 10.5 LTE , Samsung Galaxy Tab S 8.4 , Samsung Galaxy Tab S 8.4 LTE , Samsung Galaxy Tab 3 Lite 7.0 VE , Samsung Galaxy Tab 3 V , Samsung Galaxy Tab A 8.0 , Samsung Galaxy Tab A 9.7 , Samsung Galaxy Tab A & S Pen , Samsung Galaxy Tab 4 10.1 (2015) , Samsung Galaxy Tab S2 8.0 Android 6.0.1 Marshmallow - T719N , Samsung Galaxy Tab S2 9.7 Android 6.0.1 Marshmallow - T813N, T819N , Samsung Galaxy Tab E 8.0 , Samsung Galaxy Tab A 7.0 (2016) , Samsung Galaxy Tab A 10.1 (2016) , Samsung Galaxy Tab J , Samsung Galaxy Tab S3 9.7 , Samsung Galaxy Tab A 8.0 (2017) , Samsung Galaxy Tab Active 2 , Samsung Galaxy Tab A 10.5 , Samsung Galaxy Tab S4 10.5 , Samsung Galaxy Tab A 8.0 (2018) , Samsung Galaxy Tab Advanced2 , Samsung Galaxy Tab A 8.0 & S Pen (2019) , Samsung Galaxy Tab A 8 (2019) , Samsung Galaxy Tab A 10.1 (2019) , Samsung Galaxy Tab S5e , Samsung Galaxy Tab A 8.0 (2019) , Samsung Galaxy Tab S6 , Samsung Galaxy Tab Active Pro , Samsung Galaxy Ace Style , Samsung Galaxy Ace 4 LTE G313 , Samsung Galaxy Ace NXT , Samsung Galaxy Ace Style LTE G357 , Samsung Galaxy Grand 2 , Samsung Galaxy Grand Neo GT-I9060I , Samsung Galaxy Grand Prime , Samsung Galaxy Grand Prime Duos TV , Samsung Galaxy Grand Max , Samsung Galaxy Grand Prime Plus , Samsung Galaxy Core Lite LTE , Samsung Galaxy Core 2 , Samsung Galaxy Core LTE G386W , Samsung Galaxy Core Prime , Samsung Galaxy Xcover 3 , Samsung Galaxy Xcover 3 G389F , Samsung Galaxy Xcover 4 , Samsung Galaxy Xcover 4s , Samsung Galaxy Xcover FieldPro , Samsung Galaxy Pocket 2 , Samsung Galaxy View Samsung Galaxy View2, Samsung Galaxy S10, Samsung Galaxy S10 Plus, and Samsung Galaxy S10e.
Normal queries for this tutorial
- How To Resolve Custom Binary Blocked by FRP
- How To Resolve Issues While Restoring to factory defaults
- How To Resolve stuck in recovery mode
- How To Remove/replace custom recovery like TWRP, Philz, CWM etc
- How To Resolve a device bootloop/stuck/hang on the Samsung logo
- How To repair IMEI, Baseband, Serial Number, WiFi, Bluetooth and other connectivity related IDs
- How To Repair Knox
- How To Resolve heating issues on your Galaxy Smartphone
- How To Change CSC of your Samsung device
- How To Resolve Update Android Version Manually
- How To Resolve Camera issues on Galaxy Smartphones
- How To Resolve storage space full error on Galaxy Smartphones
- How To Resolve sluggish performance
- How To Resolve sensors error on Galaxy
- How To Resolve applications stop working On galaxy
- How To Delete/wipe userdata (hard reset), cache, pattern or password
- How To Remove root/root access on Galaxy Smartphone
- How To Resolve software related sound problems
- How To Resolve unable to downgrade firmware version
- How To Resolve unable to update firmware manually using Odin
- How To Resolve set warranty bit kernel
- How To Resolve “recovery is not seandroid enforcing”
- How To Resolve “Kernel/Recovery is not seandroid enforcing Set Warranty Bit Recovery”
Now lets go to the step by step procedure.
Steps To Resolve The Above Software glitches On Galaxy Android Smartphone Using Combination Firmware
1. First of all you need to download the combination firmware file corresponding to your device. As it is impractical to provide all the download links, please search in Google with your phone model and firmware version. For eg: If your phone is Galaxy S8 G950F and the combination firmware version you need is Pie 9.0. Search in Google like this “Galaxy S8 G950F Pie 9.0 Combination Firmware Download“. The downloaded file will be in “.zip” or “.tar” format.
Now;
Once the Odin file is downloaded please extract it to your PC desktop and open the Odin.xx..exe file.
2. Now enter your Samsung Galaxy Android Smartphone into the “Download Mode”. To enter into the download mode please switch of your phone and press and hold “Vol Down”+”Home”+”Power” buttons at the same time and press the “Vol Up” button when you get the warning screen to enter into the “Download Mode”. The procedure for some galay models may be different so you try the below links for more detailed model specific tutorials on download mode.
- How To Enter & Exit Download Mode on Galaxy S10, S10e & S10 Plus?
- How To Enter Download Mode On Galaxy Smartphones Without Home Button?
- How To Enter/Exit Samsung Galaxy S9 and S9+ Into Download Mode?
- How To Enter and Exit Download Mode On Samsung Galaxy Note 8?
- How To Enter and Exit Download Mode On Galaxy S8 and S8+?
- How To Enter and Exit Download Mode In Android Marshmallow Galaxy Smartphones?
3. Once in download mode connect your Galaxy Smartphone using the USB data cable. Once the connection is made successfully you will get an added message from the Odin app like shown in the screenshot below.
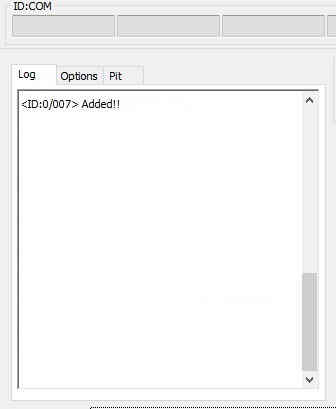
If you didn’t got the confirmation please install/reinstall the Samsung USB drivers from the below link and try again.
4. Now extract the combination “.zip” or “.tar” firmware file that you have already downloaded before. You will get 4 or 5 files after extraction like shown below.

5. Once done you may click the “AP” button and select the appropriate file (the file which starts with the name “AP”) from the extracted firmware, same way click “BL”, “CSC”, “CP” buttons and select the files.You may check the below screenshot for reference.
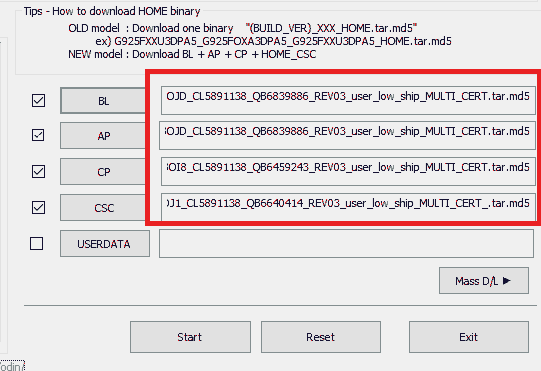
Once done click the “Start” button in Odin app to start the flashing process.
Now wait for the flashing procedure to get finished. Once finished and rebooted you are good to go.
If the whole process was successful you will get a “Pass” message in Odin as shown in the screenshot above. That’s it now all your above mentioned issues will be resolved.
However if you have faced any issues while trying to fix software glitches on your Galaxy Smartphone using combination firmware, please feel free to post it in the comment section below, don’t worry I will help you as fast I can.
If “How To Fix All Common Software Glitches On Galaxy Smartphone?” tutorial really helped you, please give a like/share on social networking websites by using the below given buttons.