
Hi guys, this tutorial will help you to root your Samsung Galaxy S7 Edge On Nougat 7.0 using the CF-Auto-Root.
The Galaxy S7 Edge, undoubtedly one of the marvelous creations from Samsung is still everyone’s favorite with it’s unique design and features. But did you rooted it to unearth more of it’s features, if not done already then please follow the below tutorial.
Compatible Models
Please note that this method is compatible on Samsung Galaxy S7 Edge SM-G9350, Samsung Galaxy S7 Edge SM-G935F, Samsung Galaxy S7 Edge SM-G935K, Samsung Galaxy S7 Edge SM-G935L, Samsung Galaxy S7 Edge SM-G935P, Samsung Galaxy S7 Edge SM-G935R4, Samsung Galaxy S7 Edge SM-G935S, Samsung Galaxy S7 Edge SM-G935T (T-Mobile), Samsung Galaxy S7 Edge SM-G935U, Samsung Galaxy S7 Edge SM-G935V (Verizon) and Samsung Galaxy S7 Edge SM-G935W8 running on Android Nougat 7.0 firmware only.
Please don’t forget to back up contacts and device data before performing the rooting steps. Also make sure that you have charged your Galaxy S7 Edge to 80% of it’s battery capacity.
For the Verizon Galaxy S7 Edge, please unlock the bootloader first using the below tutorial before proceeding with the root.
Steps to root Samsung S7 Edge running on Android Nougat 7.0 firmware using the CF-Auto-Root method
1.Now in our first step we will be downloading the correct root files from the below links;
- Downloads To Root Samsung Galaxy S7 Edge SM-G9350
- Downloads To Root Samsung Galaxy S7 Edge SM-G935F
- Downloads To Root Samsung Galaxy S7 Edge SM-G935K
- Downloads To Root Samsung Galaxy S7 Edge SM-G935L
- Downloads To Root Samsung Galaxy S7 Edge SM-G935P
- Downloads To Root Samsung Galaxy S7 Edge SM-G935R4
- Downloads To Root Samsung Galaxy S7 Edge SM-G935S
- Downloads To Root Samsung Galaxy S7 Edge SM-G935T (T-Mobile)
- Downloads To Root Samsung Galaxy S7 Edge SM-G935U
- Downloads To Root Samsung Galaxy S7 Edge SM-G935V (Verizon)
- Downloads To Root Samsung Galaxy S7 Edge SM-G935W8
Once the file is downloaded you need to extract it, the extracted contents will be as shown below.

Enabling USB Debugging
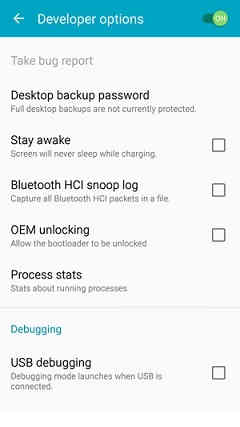
2. In the next step, you need to enable the “USB debugging” on your S7 Edge if not done already. To enable USB debugging please go to “Settings-> Developer options”and enable the “USB debugging” from the “Developer options” menu. If there is no developer options under the “Settings” menu please tap on the “build number” 7 times under “About device“.
The detailed steps to enable USB debugging is explained for Galaxy Smartphones running on Marshmallow firmware is given below, don’t worry the methods are almost same on Nougat.
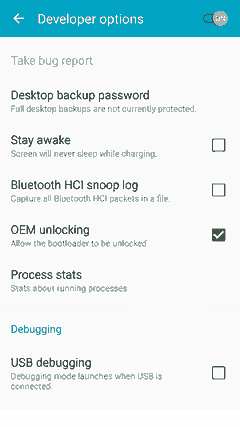
3. Now please enable “OEM unlock“. To enable “OEM unlock” please go to Settings>About phone, and tap on the “Build number” 10 times until you get a message that you are a “developer.”. Once you have enabled the “Developer Options” tap on it from the “Settings” main menu and you will see the same screen as shown below.
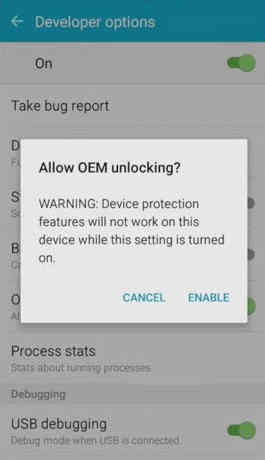
Now click on “OEM unlocking” and you will get a popup warning as shown below, tap enable it if you would like to proceed.
Alternately you can try the dedicated tutorial given below for enabling “OEM unlock”. Don’t worry if you are not seeing “OEM Unlock” in the menu options, just ignore the step and go ahead with the rest of the steps.
Entering Download Mode
4. After “OEM Unlock” is enabled, please switch off your S7 Edge and enter it into the “Download mode”. To enter into “Download Mode” please press and hold the “Power”+”Vol Down”+”Home” buttons until you get a warning screen. Once you get the warning screen please release all the buttons and press “Vol Up” button to enter into the “Download mode“.
Kindly check the below “Download mode” tutorial for Marshmallow firmware, the procedure is almost same for Nougat.
5. Now you need to run the “Odin.exe” file as administrator and have to connect your S7 Edge using the USB data cable to your computer. If the connection was successful you will get an “Added” message from “Odin” application. If you didn’t get an “Added” message please reinstall the Samsung USB drivers for your device and try again.
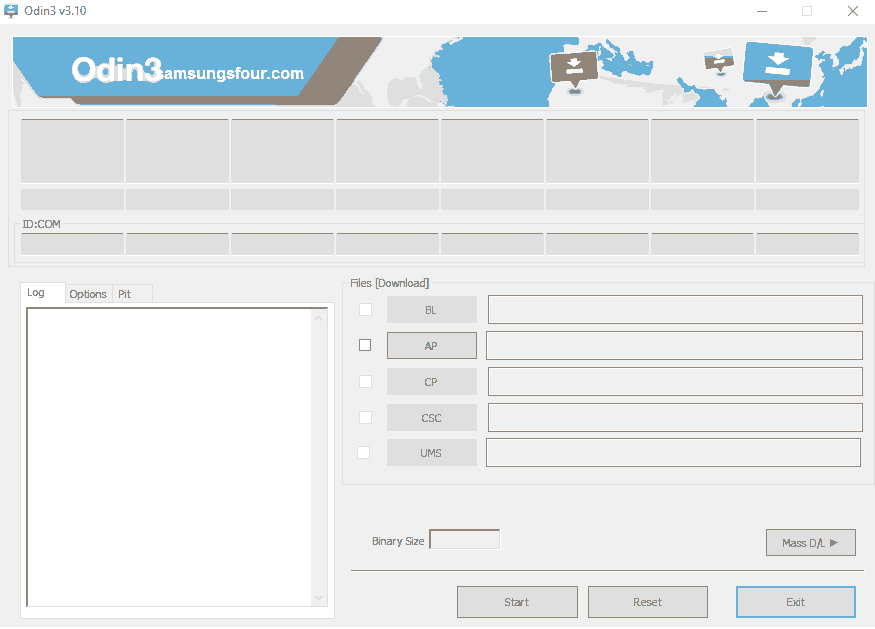
6. Now please click the “AP” button in the Odin app and select the “tar.md5” file which you have already downloaded and unzipped to your PC.
Once confirmed with everything above, please click the “Start” button in the Odin app to begin the rooting process. It is very normal that your device reboots during the course. Once restarted the S7 Edge will boot normally and you are good to go with root access.
Sometimes bad things can happen, so if you are thrown into an endless android bootloop after this procedure please resolve it by following the below given tutorial. Don’t worry because boot loop is a glitch in android firmware which can be resolved easily.
Normal queries to root Galaxy S7 Edge On Nougat 7.0
- How To Root Samsung Galaxy S7 Edge SM-G9350 Running On Android 7.0 Nougat Using The CF-Auto-Root Method?
- How To Root Samsung Galaxy S7 Edge SM-G935F Running On Android 7.0 Nougat Using The CF-Auto-Root Method?
- How To Root Samsung Galaxy S7 Edge SM-G935K Running On Android 7.0 Nougat Using The CF-Auto-Root Method?
- How To Root Samsung Galaxy S7 Edge SM-G935L Running On Android 7.0 Nougat Using The CF-Auto-Root Method?
- How To Root Samsung Galaxy S7 Edge SM-G935P Running On Android 7.0 Nougat Using The CF-Auto-Root Method?
- How To Root Samsung Galaxy S7 Edge SM-G935R4 Running On Android 7.0 Nougat Using The CF-Auto-Root Method?
- How To Root Samsung Galaxy S7 Edge SM-G935S Running On Android 7.0 Nougat Using The CF-Auto-Root Method?
- How To Root Samsung Galaxy S7 Edge SM-G935T (T-Mobile) & SM-G935URunning On Android 7.0 Nougat Using The CF-Auto-Root Method?
- How To Root Samsung Galaxy S7 Edge SM-G935V (Verizon) & SM-G935W8 Running On Android 7.0 Nougat Using The CF-Auto-Root Method?
Please note that rooting will void your warranty (don’t worry you can always reinstate warranty by unrooting it), so kindly proceed at your own risk. SamsungSFour.Com will not be liable for any damage caused as a result of executing any of the steps given above.
If you have faced any issues while rooting your Galaxy S7 Edge running on Android Nougat 7.0, please feel free to post it in the comment section below, don’t worry I will help you as fast as I can.
If “How To Root Galaxy S7 Edge On Nougat 7.0 Using CF-Auto-Root? (All Models)” tutorial really helped you, please give a like/share on social networking websites by using the below given buttons.