
Hi friends this tutorial will explain in detail on how to root Samsung Galaxy S10, S10+ Or S10e using the Magisk app.
When it comes to rooting the Android 9 Pie, Android 10, Android 11, Android 12 & Android 13 and above devices it’s not that easy like before. The whole rooting process in these devices are a little tricky and you need to follow the exact same procedure rather than the old easy method of using chain fire autoroot, SuperSU and the mighty Odin application or any ready made app. In this method we are using the Magisk app.
There is a small relief though because this process doesn’t involve TWRP.
Disclaimer: Please note that rooting voids warranty and may open your firmware to external exploits, so please proceed with caution. Also please make sure to take a complete backup of your phone data so that it can be restored if something goes wrong. Samsungsfour.com will not be liable for any loss or damage caused as a result of executing the below steps.
What are the benefits of rooting Galaxy S22, S22+ & S22 Ultra?
- Root Access
- Super User privileges
- Installation of Custom ROMs
- Ability to remove bloatwares
- Ad-blocking for all apps including preinstalled apps
- Greater battery life / speed
- CPU Clocking
Rooting Galaxy S10 with Magisk an Introduction
Even after rooting using this method, there is still an option to use the stock recovery or the custom recovery using some key combinations. Isn’t it amazing!
As these steps involves factory resetting please make sure that you have made a complete backup of your phone memory first before proceeding with the root steps.
The credit for this wonderful root method goes to our engineers at XDA Developers.
Before proceeding with the below steps please ensure that you have downloaded and installed the Samsung USB drivers from the below link;
Steps To Root Galaxy S10, S10+ Or S10e Using Magisk App
1. First you need to perform the OEM unlock.
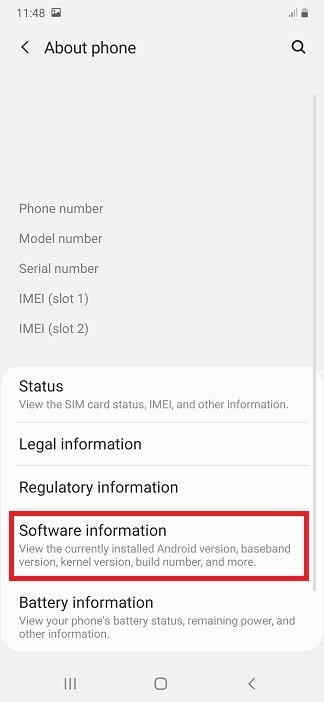
For that first you need to enable “Developer Options” on your Galaxy Smartphone. For that first goto Settings>About phone

Now tap on “Software Information” here.
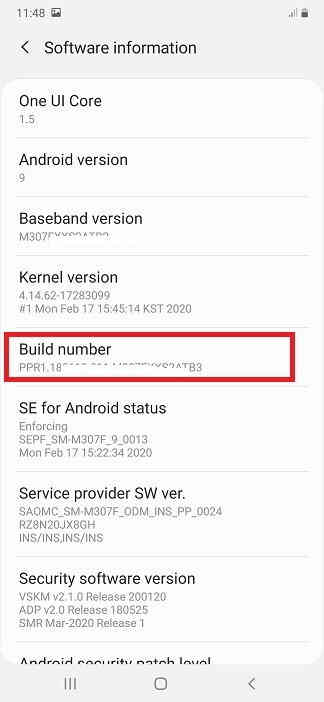
Now when in the above page tap on “Build number” 10 times or until you get the popup “You are now a developer” to enable the “Developer options“.
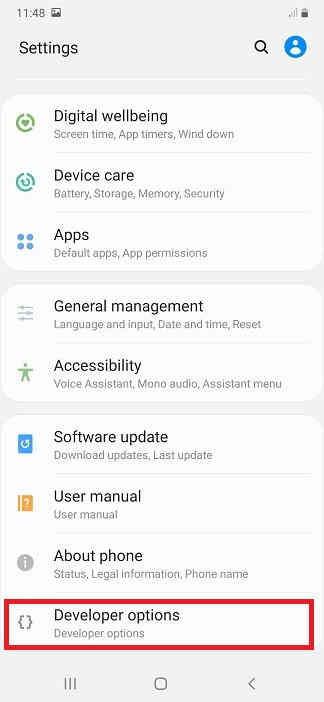
Next go back to the previous menu now and you will be able to see the “Developer options” at the bottom of the previous page. Please make sure that you are connected to the internet all these times.
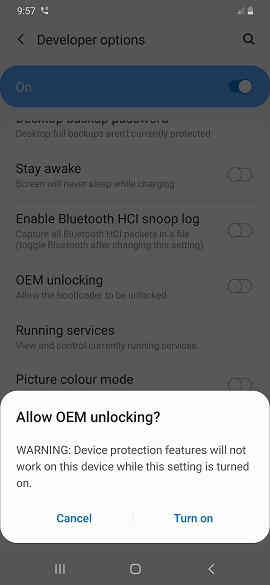
Here tap on “OEM unlocking” and you will get the below warning. Now tap on “Turn on” to activate the “OEM unlocking“.
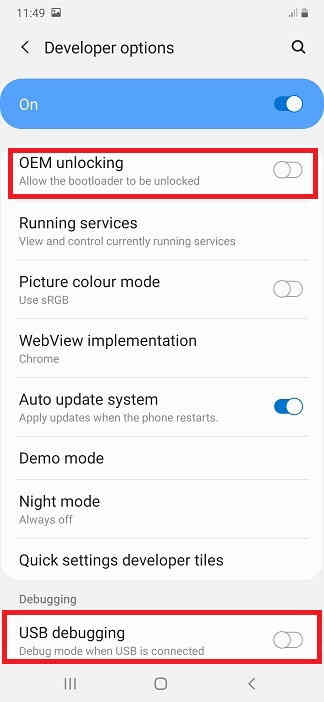
To enable “USB debugging” tap on the corresponding menu entry and you will get the below warning. Now same way tap on “Turn on” to activate the “USB debugging“.

When everything is enabled you will get the page as shown below.

Further, unlike previous devices there is an additional security feature in the new Android firmwares which is called “vaultkeeper“ that will messup the unlocked bootloader.
So you need to perform some additional steps to keep the unlocked bootloader intact.
For that;
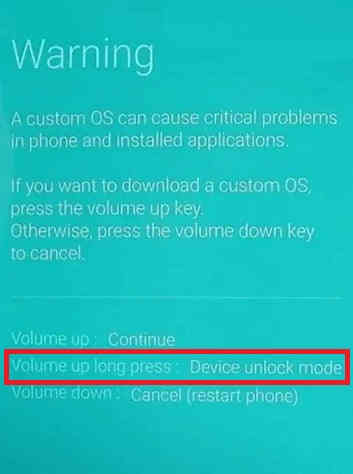
Please switch off your Galaxy S10 now and wait for the device to completely switch off. Now while pressing and holding the “Bixby” and “Vol Down” buttons together connect your S10 device to your PC using the USB data cable. When you get the warning screen like given below release the buttons and press and hold the “Vol Up” button to unlock the bootloader on your Samsung Galaxy S10, S10+ or S10e.
Once done your Galaxy S10/S10e/S10 Plus will be automatically factory resetted and rebooted. When it is completely booted up you need to enable the “OEM Unlocking” again by going back to step 1.
Now make sure that “OEM Unlocking” in the “Developer Options” is “ON” and greyed out. If so you are good to proceed.
Downloading firmware files to root Galaxy S10
2. In this step you need to download the firmware corresponding to your device.
- 1. Download Samsung Galaxy S10 Firmwares: SM-G973F, SM-G973U, SM-G973U1, SM-G973W, SM-G9730
- 2. Download Samsung Galaxy S10+ Firmwares: SM-G975F, SM-G975U, SM-G975U1, SM-G975W
- 3. Download Samsung Galaxy S10e Firmwares: SM-G970F, SM-G970U, SM-G970W
- 4. Download Samsung Galaxy S10 5G Firmwares: SM-G977B, SM-G977U, SM-G977N
You may need to login/create a free account to download the files. Also make sure that your phones bootloader is not locked by any carrier if so, please unlock it first.
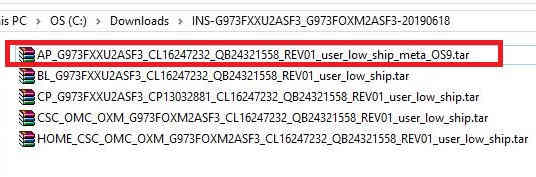
Please use the above screenshot as reference for finding the above mentioned file.
Now copy the file which starts with “AP” and ends with “.tar” extension to your phone’s storage. In the next step download and install the Magisk Manager Application from this link and install it. Download the latest version.
Please don’t forget to navigate to your phone settings menu, and to the security settings. Enable the Install from Unknown Sources option.
Installing Magisk
Now once installed open “Magisk Manager” app and tap on the ‘Install’ button where it says “Magisk is not installed“. In the next popup frame or when you click the “Install” button again you will get an option to select the patch file. Here select the “APxxxxxxxxxx.tar file that was copied earlier to you phone.
Magisk Manager application will now patch the file and output the patched system firmware (AP) file to the path ‘[Internal Storage]/Download/’
Now copy the patched file ‘magisk_patched.tar’ from ‘[Internal Storage]/Download/’ to your PC desktop.
Before proceeding to the next step please ensure that you have downloaded and unzipped the Odin v3.13.1 to your PC from this link.
Once extracted run the odin_xxxx.exe file.
Now disconnect your phone from PC and enter it into the “Download Mode“. To enter into the download mode switch of your phone first, once it’s completely in the power down status press and hold the “Vol Down” and “Bixby” buttons, while holding all the buttons connect your phone to your PC. Now you will get a warning message on your phone screen. Once you get that press “Vol Up” button to enter into the “Download Mode” on your Samsung Galaxy S10, S10+ or S10e.
Adding files in Odin
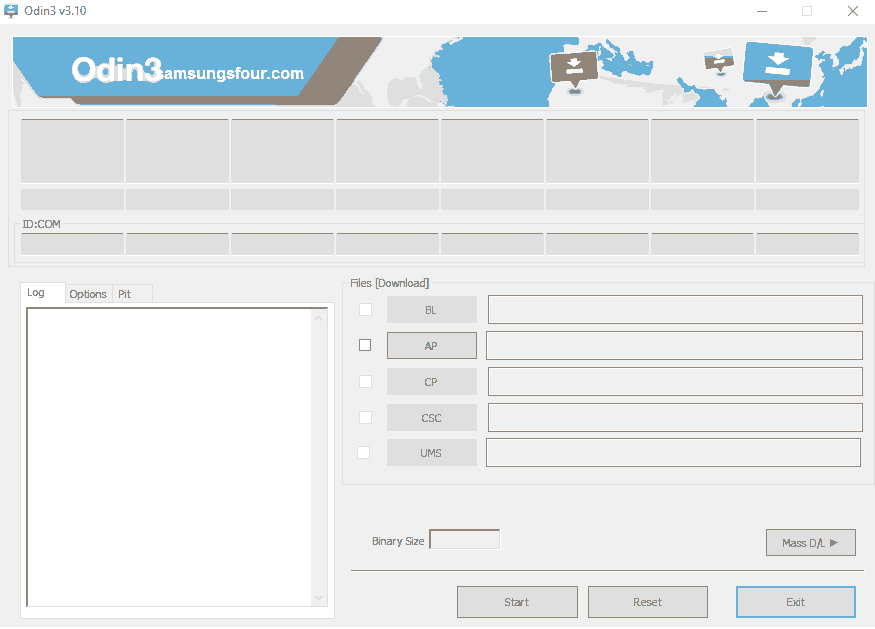
Now lets get back to the already opened “Odin” application. There you will get the above window on your PC. Now click the “AP” button from Odin and select the “magisk_patched.tar” file you have just copied from your Galaxy S10, S10e or S10 Plus. Please don’t forget to uncheck “Auto Reboot” from “Odin” “Options“.
Once done please click on the “Start” button in the Odin window and wait for the process to complete. When the process finishes exit the “Download Mode” and enter into the “Recovery Mode“. For that first press ‘Power’ and ‘Vol Down’ buttons to exit download mode. Now as soon as the phone display turns off, press and hold the ‘Power’ + ‘Bixby’ + ‘Vol Up’ buttons at the same time. When you see your phone’s model on the screen just release all the buttons except the “Vol Up” buttons to enter into the stock recovery. Now in the recovery mode use the Vol Up and Vol down buttons to toggle through the options. Now highlight the ‘Wipe data/factory reset’ option and press the “Power” button to confirm the action.
Once the factory data reset is completed select the ‘Reboot system now’ option from the same recovery mode menu and immediately press and hold the “Power+Bixby+Vol Up” buttons until the Bootloader Warning screen appears on your S10 screen. Immediately release all the buttons now to boot your Galaxy S10, S10+ or S10e into the rooted system.
There is one more step left, once your phone is booted up, open the “Magisk Manager” app and it will perform all the remaining necessary actions. Once done, your Galaxy S10, S10+ or S10e will reboot automatically and it will be rooted with Magisk!…Hurray!
Please note that unlike the previous firmware this root will be lost if you switch ON your phone normally so please keep the below things in mind while you switch OFF and switch ON your S10.
Boot Options
To boot into unrooted system (Galaxy S10, S10e or S10 Plus): Just switch of your phone and press the power but as we normally do to switch it on.
Rooted System (Galaxy S10, S10e or S10 Plus) with Magisk: First switch of your phone and press and hold the “Power+Bixby+Vol Up” buttons at the same time. Now release all the buttons once the Bootloader Warning screen appears to boot your Galaxy S10,S10e or S10 Plus into rooted system with Magisk.
Stock Recovery: When in power down status press and hold the “Power+Bixby+Vol Up” buttons at the same time. Release all the button when the Bootloader Warning screen appears except the “Vol Up” button to boot your Galaxy S10 into stock recovery.
Normal queries for this tutorial
- How To Root Samsung Galaxy S10 running on Android 9 Pie Using the Magisk App?
- How To Root Samsung Galaxy S10 Plus running on Android 9 Pie Using the Magisk App?
- How To Root Samsung Galaxy S10e running on Android 9 Pie Using the Magisk App?
If “How to Root Samsung Galaxy S10, S10+ Or S10e Using Magisk?” tutorial really helped you, please give a like/share on social networking websites by using the below given buttons or make comment if you have faced any issue.