
Dear friends, this tutorial will help you to take a screenshot, screen capture or screen grab with your Samsung Galaxy F13 SM-E135F Android Smartphone using two simple methods.
Galaxy F13 specs
The Samsung Galaxy F13 is a mid range phone with pretty decent specs. It is realized using the Exynos 850 chipset having 4×2.0 GHz Cortex-A55 and 4×2.0 GHz Cortex-A55 processors. When it comes to the display it holds a 6.6 inches PLS LCD touchscreen display having Corning Gorilla Glass 5 protection on top of it.
The triple camera assembly comes with a 50 MP main sensor. There is a massive 6000 mAh battery which is enough for a couple of days.
We have Waterfall Blue, Sunrise Copper and Nightsky Green colour options to choose.
How can we use a screenshot?
Screenshots will help you to remember a particular page even after years. The screenshot will be in JPG or PNG format so that you can store it anywhere. It is also helpful as a proof of payment. You just need to take the screenshot of the payment page.
Steps to take screenshot on Galaxy F13
Method-1 using palm swipe
In this method we are going to take the screenshot using a palm swipe. To do that first you need to enable the feature from settings menu if not already did.
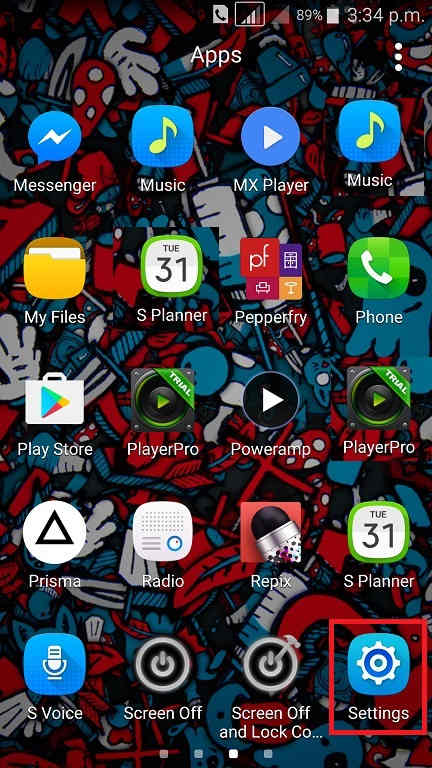
For that tap on “Settings” from the app drawer.
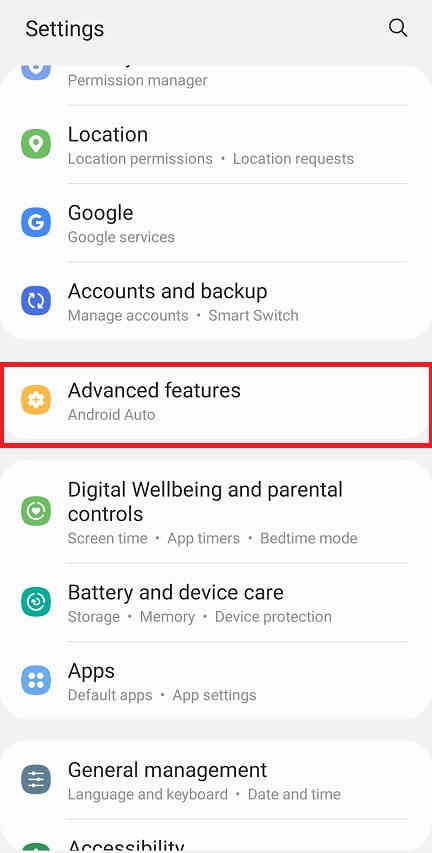
Now scroll down and tap on “Advanced features”.
When in “Advanced features” menu tap on “Motion and gestures“.
Once done you will get the below page. Here enable “Palm swipe to capture” if not already did on your Galaxy F13.
When enabled the switch will turn to blue colour and will get greyed out when disabled.
Now as the feature name suggest just swipe your palm across the screen of which you want to have a screenshot and the image will be saved in the “Gallery” in JPEG or PNG format
However if you want to edit the way the screenshots are saved and need to do some other customization please tap “Screenshots” when in the “Advanced features” main menu. Below given is the “Advanced features” main menu.
Now you will get the below page. Here you may disable the “Screenshot toolbar“, change the screenshot image format from JPG to PNG etc.
Now lets proceed to the method 2.
Method-2 using key combination
This method is the most easiest one among the two. In this you just need to press and hold the “Vol-Down” + “Power” buttons at the same time to get a screenshot of the active screen.
Normal queries for this tutorial
- How To Take A Screenshot on Galaxy F13 SM-E135F?
- Take A Screen print on Galaxy F13 SM-E135F?
- How To Take A Screen grab on Galaxy F13 SM-E135F?
If you have faced any issues while trying to take a screenshot/screen print/screen grab on your Galaxy F13, please feel free to contact us.
If “How To Take A Screenshot On Galaxy F13 SM-E135F? (2 Methods)” tutorial really helped you, please give a like/share on social networking websites by using the below given buttons.