In this tutorial we will not be beating the bush again with the specs and that sorts of things because we have already talked about it in the previous root tutorial for A8+ running on the Nougat firmware. So in this tutorial we are going to explain only the rooting steps needed to root your Samsung Galaxy A8+ (2018) SM-A730F running in the Android Oreo 8.0 firmware using the CF Autoroot method.
Please note that you need to take a backup of your complete files on your phone memory, just a precaution for worst case scenario. Also please keep in mind that the rooting will void your warranty. SamsungSFour.com is not liable for any damage caused as a result of this tutorial.
If you are interested in other Galaxy A8+ tutorials please check them out below;
- All Galaxy A8 (2018) And Galaxy A8+ (2018) Secret Codes
- How To Root Galaxy A8+ (2018) SM-A730F On Nougat 7.1.1 Using CF AutoRoot?
Steps To Root Samsung Galaxy A8 Plus (2018) SM-A730F running on Android Oreo 8.0 using CF AutoRoot
1. First from the below given link please download the root file (Please use the comment form below to report broken download links).
2. Once downloaded please extract it to your computer desktop for easy access. You may check the below screenshot to get idea on the extracted contents.

3. Now enable USB debugging mode on your phone. Please follow the below tutorials to enable USB Debugging on your phone. Below tutorial is not for the Oreo firmware but the procedures will be somewhat similar.
4. Once done please switch of your phone and enter it into the “Download mode“. To enter into download mode press and hold the“Vol Down”+”Volume Up”+”Power” buttons at the same time until you see a warning screen like shown below. When you get the warning screen please press “Vol up” to continue and enter into the download mode.

You may also try the below given download mode tutorials for detailed instructions on entering into the download mode.
Once done please install the Samsung USB drivers from the below link.
5. Now open the “image” folder (from the earlier downloaded files) and you will see a file named “image.tar.md5” like shown in the screenshot below.
![]()
6. Once done go back to the main folder and you will see contents like in the below screenshot.
7. There please open the “tools” folder and run the “Odin.exe” file from there.

Double click the “.exe” file to run it and you will get a similar Odin window as shown belo. Now connect your phone using the USB data cable to your PC. If the connection was successful you will get an added message in the “Odin” app.
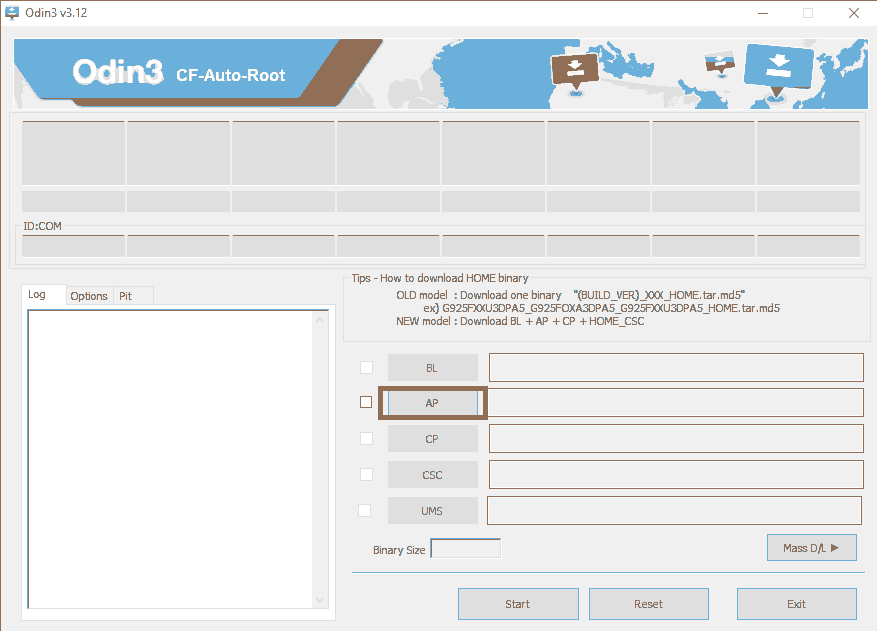
In the next step you have to click the “AP” button in the Odin and select the “image.tar.md5” file you found in the “image” folder (mentioned in step no: 5). Once done please click the “Start” button in the Odin app to start the rooting process.
Once the rooting process is started it will get completed by it’s own. Once done the Galaxy A8 Plus (2018) will reboot and you will get a “Pass” message from the Odin. You may also confirm the rooting using any rootchecker app which can be installed from the Google Play Store.
That’s it guys, please don’t forget to like/share in the social networking sites if this tutorial was helpful.
Normal Queries For This Tutorial:
- How To Root Galaxy A8+ (2018) SM-A730F Running On Android 8.0 Oreo Using CF AutoRoot?
- How To Root Galaxy A8 Plus (2018) SM-A730F Running On Android 8.0 Oreo Using CF AutoRoot?
If you have faced any issues while trying to root Samsung Galaxy A8 Plus (2018) SM-A730F running on Android Oreo 8.0, please feel free to post it in the comment section below, don’t worry I will help you as fast as I can.
If “How To Root Galaxy A8+ (2018) SM-A730F On 8.0 Oreo Using CF AutoRoot?” tutorial really helped you, please give a like/share on social networking websites by using the below given buttons.