
Hi friends, this tutorial will help you to root your Samsung Galaxy J2 2016 SM-J210F running On Marshmallow 6.0.1.
A brief intro to Galaxy J2 2016
The Samsung Galaxy J2 (2016) of course released in the year 2016 is a budget phone from the Koreans but with decent specs inside. It comes with a Quad-core 1.5 GHz Cortex-A7 processor, Mali-400MP2 GPU, 1.5 GB RAM, 8 MP front camera and 5.0 inches Super AMOLED capacitive touchscreen display.
When coming to the software side it is packed with the Android 6.0.1 Marshmallow firmware in it’s hood. Today we are going to root the same Android 6.0.1 Marshmallow firmware which came packed in the Samsung Galaxy J2 (2016) SM-J210F.
Before rooting
However before proceeding with the root steps let me explain in a brief what is rooting and what are the benefits you get after rooting your phone. Rooting is nothing but unlocking your operating system so you can install unapproved apps, deleted unwanted bloatware, overclock (or under clock) the processor, customize in large and so on or simply helping you to install some apps which you will not be able to install without root.
Once rooted you will get superuser privileges on your phone, same like the administrator account on your Windows PC. Apart from this you will be able to install popular apps like Titanium Backup, AdAway, Quick Boot (Reboot, System App Remover, DiskDigger, SuperSU, Greenify etc etc…
Kindly note that this method is compatible only on Galaxy J2 (2016) SM-J210F running on stock Android Marshmallow 6.0.1 firmware.
Please note that you need to take a backup of your complete files on your phone memory, just a precaution for worst case scenario. Also please keep in mind that the rooting will void your warranty. SamsungSFour.com is not liable for any damage caused as a result of this tutorial.
All the Chain Fire Autoroot procedures are same, no matter on what devices it’s performed. However we will try to conclude it in 5 main steps as given below.
In concise the rooting procedure consists of mainly 5 steps;
- Making backup of your phone memory to an external storage
- Enabling OEM Unlock and USB Debugging
- Downloading the root files
- Entering into the download mode
- Starting the rooting procedure with the Odin application on your desktop computer.
Let me hope that you have got an idea on the CF Autoroot rooting procedures. So lets proceed with the rooting steps in the order listed above.
Steps To Root Samsung Galaxy J2 (2016) SM-J210F on Marshmallow 6.0.1 using CF AutoRoot
1. First you need to download the root file required to root your phone. You can download the same from the below given link (please report broken download links using the comment option at the end of this tutorial).
Downloads For Rooting Samsung Galaxy J2 (2016) SM-J210F
2. Once downloaded please extract it to your PC desktop. You can check the below screen print to have an idea on the extracted contents.

3. In the next step you need to enable ‘USB debugging mode” on your phone. Navigate to Settings menu to enable the USB debugging or please follow the below tutorial to enable it.
4. Once done please enable the OEM unlock. The below tutorial will help you to enable it.
Entering Download Mode
5. Once done please switch of your phone and enter it into “Download mode“. Download mode is a special mode in Android Smartphones used to flash new firmware or recovery images.
To enter into download mode press and hold the“Vol Down”+”Home”+”Power” buttons at the same time until you see the warning screen. When you get the warning screen please press “Vol up” to continue and enter into the download mode.
You may also try the below given download mode tutorials for detailed instruction on entering into the download mode.
- How To Enter and Exit Download Mode In Android Marshmallow Galaxy Smartphones?
- How To Enter Samsung Galaxy Smartphone Into Download Mode?
In the next step you need to instal the necessary Samsung USB drivers for your phone and install it from the link given below. If the drivers are not installed properly the Odin may not detect your device in the coming step.
6. Now open the “image” folder (from the earlier downloaded files) and you will see a file named “image.tar.md5” like shown in the screen print given below.
![]()
7. In the next step go back to the main folder and you will see contents like in the below screenshot.
8. Once you are in the main folder please open the “tools” folder and run the “Odin.exe” file from there.

Double click “Odin.exe” file to run it and you will get the application opened as shown in the screen print below. Now connect your phone using the USB data cable to your computer. If the connection was successful you will get an added message in the “Odin” app (if not please reinstall the USB drivers).
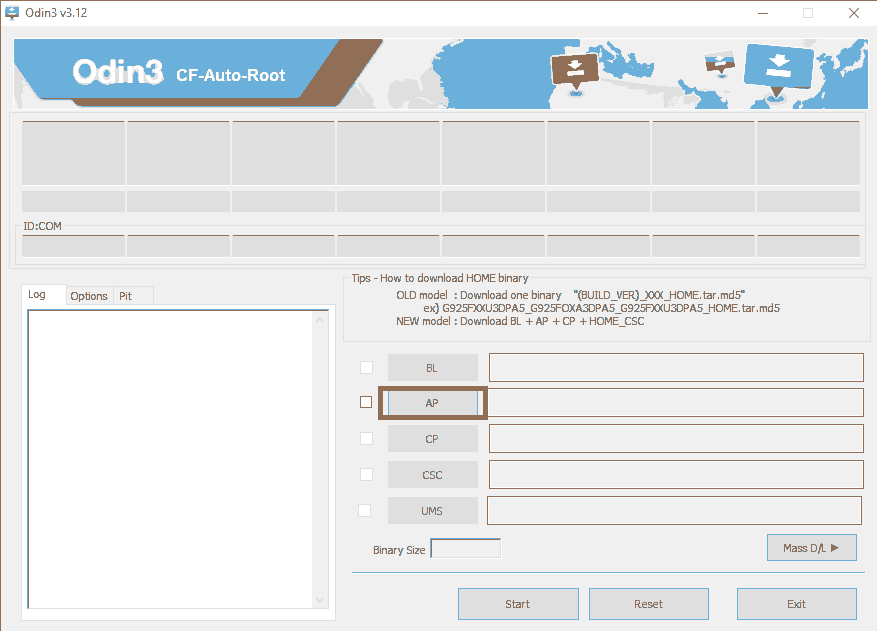
Once done click the “AP/PDA” button in the Odin application and select the “image.tar.md5” file in the “image” folder (mentioned in step no: 6). When done please click the “Start” button in the Odin app to begin the root process.
When the root process is initiated the rest of the processes are all automated, so no user intervention is needed further. Once the process is completed you will get a “Pass” message which confirms the process was a success.
Please don’t forget to like/share in the social networking sites if this tutorial was helpful.
Normal queries to root Galaxy J2 2016 on Marshmallow 6.0.1
- How To Root Samsung Galaxy J2 (2016) SM-J210F On Marshmallow 6.0.1 Using CF AutoRoot method?
If you have faced any issues while trying to root your Galaxy J2 (2016) SM-J210F running on Marshmallow 6.0.1, please feel free to post it in the comment section below, don’t worry I will help you as fast as I can.
If “How To Root Galaxy J2 (2016) SM-J210F On Marshmallow 6.0.1?” tutorial really helped you, please give a like/share on social networking websites by using the below given buttons.